

Build Comp Vis Human Classifier on Unsplash Lite Dataset
Demonstrating Transfer Learning Feature Extraction using TensorFlow Hub Models


Introduction
All the machine learning problems can be solved by creating neural network problems from scratch using our custom data to fit, compile and build and then further improve our network by adding more layers, adjusting the number of neurons, changing the learning rate, getting more data to train and so and so forth.
However, doing this will consume our energy rather than focusing on the problem we're trying to solve and the dataset, we spend our time building the same architecture for our neural network every time.
The pain increases more especially when you've very fewer data to train your network from scratch.
But to overcome such pain and complex creation or designing neural network architectures from scratch we can use the patterns(also called weights) that are learned by a model on other datasets for another problem, on our dataset and problem using Transfer Learning.
For this experiment, we're using Feature Extraction Transfer learning, i.e the architecture of the pre-trained model will be similar, but will be used with our custom dataset.
We'll be using ResNetV2 & EfficientNetB0 models from Tensorflow Hub for this experiment.
Problem Definition
We're working towards building a pre-trained model and adding our custom layers on top, extracting all of the underlying patterns learned on another dataset and using them on our unsplash extracted images to classify whether an image contains human or not.
You can directly refer to the repository if you're interested in understanding the code.
Note: Before moving forward, you may need to download the Unsplash Lite Dataset and process them for this experiment. Please follow the steps from this notebook for preparing the data.
Creating Data Loaders (preparing the data)
There are a couple of ways to load the data and prepare it for our network, and the most commonly used are ImageDataGenerator, and one more image_dataset_from_directory function from tensorflow.keras.preprocessing.image.
For now, let's use the basic one ImageDataGenerator, since we are not using a larger dataset so it'll be fine, but if we have to use a larger dataset then we should use image_dataset_from_directory function since it creates a tf.Data.Dataset object rather than a generator.
Since we are dealing with predicting a class i.e binary classification problem, so I've created a dataset in that format only.
Directories are in the below format for training and test dataset,
train/human, train/non-human
test/human, test/non-human
# setup the data inputs
from tensorflow.keras.preprocessing.image import ImageDataGenerator

IMG_SHAPE = (224, 224)
BATCH_SIZE = 32

# declaring constant drive paths
drive_path = 'your drive path where you saved the unsplash processed photos'
train_dir = drive_path + 'photos/train/'
test_dir = drive_path + 'photos/test/'

# Instantiating ImageDataGenerator
# rescaling since the the range of image tensors would be between 0-255
train_datagen = ImageDataGenerator(rescale=1/255.)
test_datagen = ImageDataGenerator(rescale=1/255.)

print('Training images:')
train_data_10_percent = train_datagen.flow_from_directory(
train_dir,                                                              target_size=IMG_SHAPE,                                                          batch_size=BATCH_SIZE,                                                          class_mode='binary')

print('Test images:')
test_data = test_datagen.flow_from_directory(test_dir,
                                             target_size=IMG_SHAPE,
                                             batch_size=BATCH_SIZE,
                                             class_mode='binary')
Setting up Callbacks
Before building our model, to track how is our model performing or how much further training is required for our model, and a few more things we can do via callbacks which executes during or after training our model.
Since we want to visualize the performance of two models of tensorflow_hub and compare them, so we'll be creating a TensorBoard callback, which will create a dashboard for inspecting neural network parameters.
The Tensorboard callback can be accessed using tf.keras.callbacks.TensorBoard().
Its main functionality is saving a model's training performance metrics to a specified log_dir.
To track our modelling experiments using Tensorboard, we'll create a function which creates a tensorboard callback for us, so that each time when we fit our model, it creates a new one each time.
# Create tensorboard callback
import datetime
import tensorflow

def create_tensorboard_callback(dir_name, experiment_name):
  log_dir = dir_name + "/" + experiment_name + "/" + datetime.datetime.now().strftime('%Y%m%d-%H%M%S')
  tensorboard_callback = tensorflow.keras.callbacks.TensorBoard(
      log_dir = log_dir
  )
  print(f'Saving Tensorboard Log files to: {log_dir}')
  return tensorboard_callback
Creating models using TensorFlow Hub
We're going to use two models from Tensorflow Hub:
ResNet50V2: a state of art computer vision model architecture from 2016
EfficientNetB0: a state of art computer vision model architecture from 2019
💡 The Tesla Vehicle AI processes huge doses of information in real time. So the Computer Vision workflow runs all the tasks on a shared backbone called ResNet-50 that can run 1000×1000 images at a time.
First, we need to define the feature vector URLs of each model to be used in our model.
Feature vector URLs can be found in TensorFlow Hub (please click on the model to get redirected to its TensorFlow Hub page),
EfficientNetB0(2019), ResNetV250(2016)
# Resnet50V2 feature vector
resnet_url = "https://tfhub.dev/google/imagenet/resnet_v2_50/feature_vector/4"

# EfficientNetB0 feature vector
efficientnet_url = "https://tfhub.dev/tensorflow/efficientnet/b0/feature-vector/1"
These URLs link to a saved pre-trained model on Tensorflow Hub.
When we use them in our model, the model will automatically get downloaded for us to use.
To do this, we can use the KerasLayer() model inside the TensorFlow Hub library.
Since we're going to be comparing two models, to save ourselves code, we'll create a function create_model(). This function will take a model's TensorFlow Hub URL, instantiate a Keras Sequential model with the appropriate number of output layers, compile the model and return the model.
def create_model(model_url):
  """
  Takes a TensorFlow Hub URL and creates a Keras Sequential model with it.

  Args:
    model_url(str): A tensorflow hub feature extraction URL
  Returns:
    A compiled Keras Sequential model with model_url as feature extractor layer
    and Dense output layer with num_classes outputs.
  """

  # Download the pretrained model and save it as Keras Layer
  feature_extractor_layer = hub.KerasLayer(model_url,
                                           trainable=False, # freeze the underlying patterns
                                           name='feature_extractor_layer',
                                           input_shape = IMG_SHAPE+(3,))

  # Create our own model
  model = tf.keras.Sequential([
      feature_extractor_layer, # Use feature extraction layer as the base
      layers.Dense(1, activation='sigmoid', name='output_layer') # create our own output layer
  ])

  # compile our model
  model.compile(loss=tf.keras.losses.BinaryCrossentropy(),
                optimizer='Adam',
                metrics=['accuracy'])

  return model
Great! Now we've got a function for creating a model, we'll use it to first create and compile a model using ResNet50V2 architecture as our feature extraction compiled model.
Then we'll fit the model with our training data and test data and also use the callbacks.
First the resnet50v2 model,
# create and compile the model
resnet_model = create_model(resnet_url)

# fit the model
resnet_history = resnet_model.fit(
train_data_10_percent,
epochs=5,                               steps_per_epoch=len(train_data_10_percent),                                  validation_data=test_data,                                  validation_steps=len(test_data),                                  callbacks=[create_tensorboard_callback(dir_name='tensorflow_hub',                                                                         experiment_name='resnet50v2')])
and Then, efficientnet model,
efficient_model = create_model(efficientnet_url)

# fit the model
efficient_history = efficient_model.fit(
train_data_10_percent,
epochs=5,                                  steps_per_epoch=len(train_data_10_percent),
validation_data=test_data,
validation_steps=len(test_data),
callbacks=[create_tensorboard_callback(dir_name='tensorflow_hub',                                                                         experiment_name='efficientnet')])
Comparing Models using TensorBoard
Since we've already created a callback function to save the logs of each experiment we did for each model, we can preview those logs using TensorBoard.
To visualize them, we can upload the results to TensorBoard.dev
By uploading it to TensorBoard.dev, we can share the results with others as well.
For uploading a series of TensorFlow logs to TensorBoard, we can use the following command:
!tensorboard dev upload --logdir ./tensorflow_hub/ \
  --name "EfficientNetB0 Vs ResNet50V2" \
  --description "Comparing two different TF Hub feature extraction models architecture using 10% of unsplash images of human and non-humans" \
  --one_shot # this is to exit
After running this code, you may be asked for two things,
first, agree on the conditions that your experiments will be public and viewable to everyone
second, it will provide the link to click and give permission through your google account, after this it will generate an authorization code which you need to enter in the colab.
After doing above things, you'll get a tensorboard URL, which will display the experiment we did.
I've uploaded on TensorBoard, and you can check the plotted accuracy and loss of each models here,
https://tensorboard.dev/experiment/6QZoenQwQ4KHX2T42h6DMw/
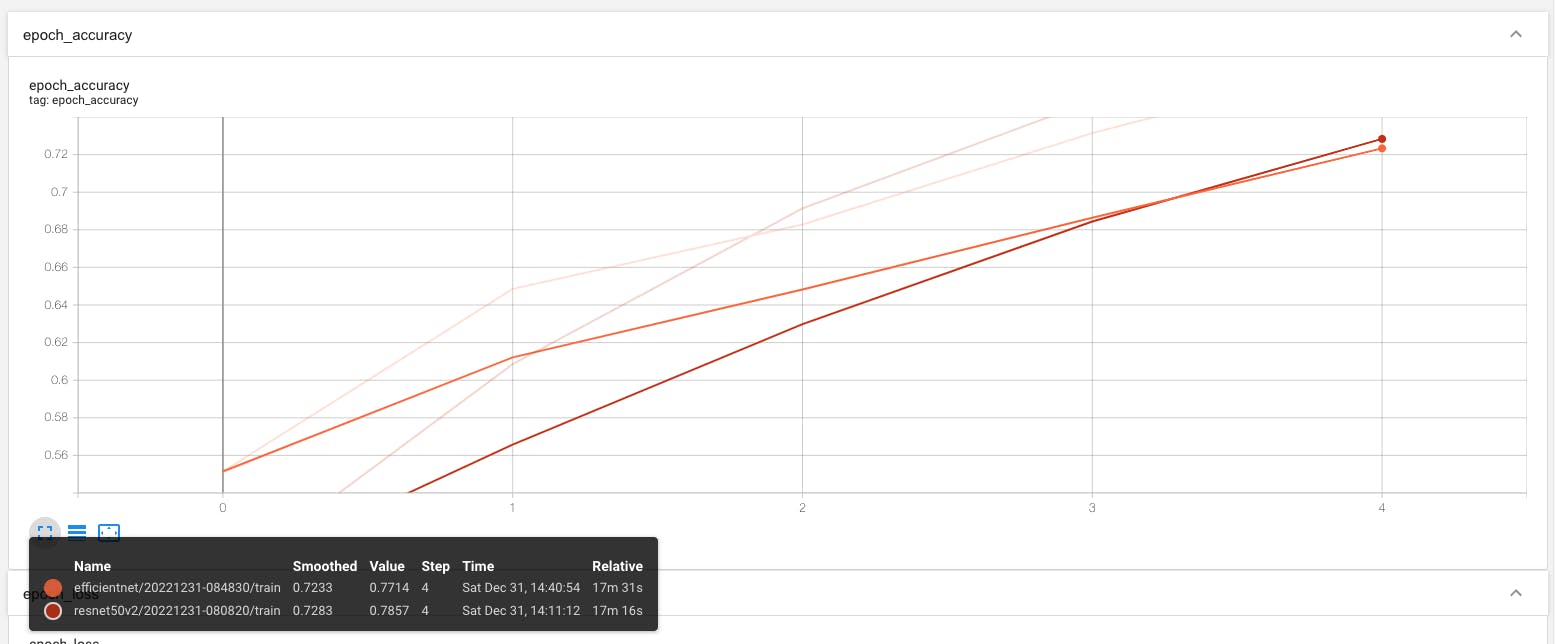
If we compare the accuracy on Training set of both the models, it seems good, and it will be more better if we train our model for little longer,
Fig 1 : Training Accuracy of EfficientNet Vs ResNet
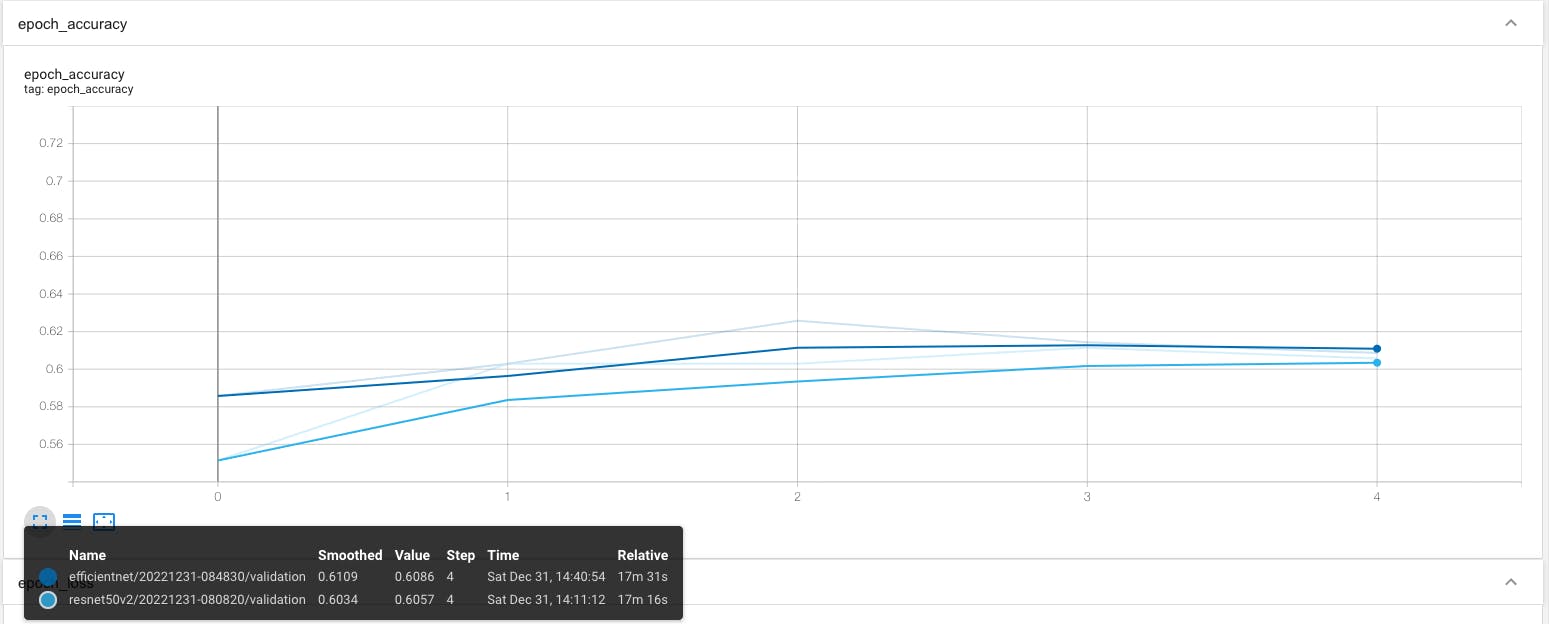
If we compare the accuracy on Validation set (test set) of both the models, it's not quite good as compared to Training accuracy, we might need to take actions to optimize our model.
Fig 2: Val Accuracy of EfficientNet vs ResNet
Next
By viewing on TensorBoard, it looks like our models are not performing well enough on test data, which means it only learned the training set so well that it's not able to predict well on test data (newer data).
Next, we can take some steps to optimize our model, but before that, we must purify our dataset because there are some images which are not correct.
In some images, even if there is no human in that image but sitting inside the folder of Human. So I'll continue this experiment after purifying the dataset of humans and non-humans and then compare and train the feature-extracted models again.
To get further updates on this experiment, you can follow me on Github or just Watch below repo.
Till then, Keep Learning and Building 🦾