Before jumping directly to the topic, let's go through the process how basically (very basic) AR works .
So, AR relies on Computer Vision to see the world and recognise the objects in it and Computer Vision process is getting the visual information, the environment around the hardware to the brain inside the device.
The process of scanning, recognising, segmenting and analysing environmental information is called tracking, in immersive technologies.
There are two ways to track, Inside-Out Tracking and Outside-In Tracking.
Outside-In : In this process, the cameras or sensors aren't housed within the AR device itself, they're mounted elsewhere in space.
Inside-Out : AR device has internal cameras and sensors to detect motion and track positionin, for example Smartphones and Head Mounted Display (HMD) like Hololens.
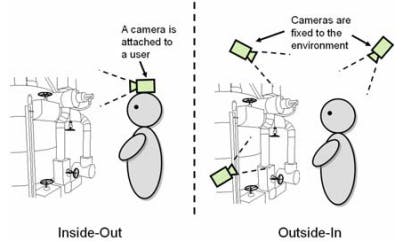
For now, we'll take the approach of Inside-Out tracking as it's really affordable to have a basic understanding of AR through Smartphones.
Tracking through camera and sensors helps to take inputs in form of feature points and other specific features from the environment and do something with that input either place some digital 3D assets into the real environment or provide some information about that tracked environment to operate it further.
But to really see the magic of AR through smartphones we need some libraries to implement those features in our mobile apps.
So we have, ARCore SDK by Google for Android devices and ARKit SDK by Apple for iOS devices for building and developing mobile AR experiences.
But we don't need to learn both ARCore and ARKit SDKs and it's APIs to build AR apps for Android and iOS devices. Unity made it easier by launching AR Foundation SDK for AR developers where they can build cross platform apps by installing particular packages and switch platforms based on their target device.
package manager
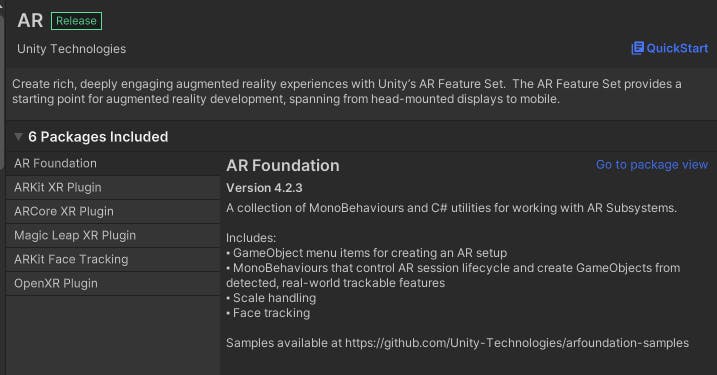
switch platforms

Unity also provides packages for building AR apps for other HMD devices as well.
AR Foundation
AR Foundation allows you to work with augmented reality platforms in a multi-platform way within Unity. This is just an interface for the developers to use other packages on top of it to implement any AR feature on their targeted device.
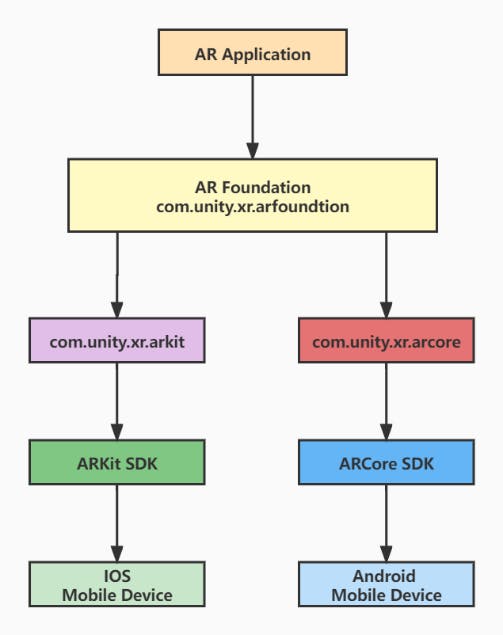
AR Foundation is a set of MonoBehaviours and APIs for dealing with devices that support various concepts like 2D Image tracking, Device tracking, Plane detections, Raycasting and many more.
MonoBehaviour is just a base class from which every Unity script derives but it's not necessarily mean that all Unity scripts need to inherit from MonoBehaviour. For now let's understand it as, every script that we attach with a GameObject to perform some action or events needs to inherit from MonoBehaviour class.
ARKit XR Plug-in
To build AR apps for iOS device using Unity we need this package to install along with ARFoundation package from package manager.
This package enables native ARKit support via Unity's multi-platform XR API and implements some XR subsytems like Image tracking, Plane Detections, Object Tracking, Depth Sensing.
A subsystem is basically a platform-agnostic interface for surfacing different types of functionality and data. XR Subsystems provides the interface for various subsystems that mentioned above as well and all subsystems have the same lifecycle: they can be created, started, stopped and destroyed.
Setup
Install AR Foundation and ARKit packages from package manager.

Set up AR Session Origin and AR Session Game Object to your Scene
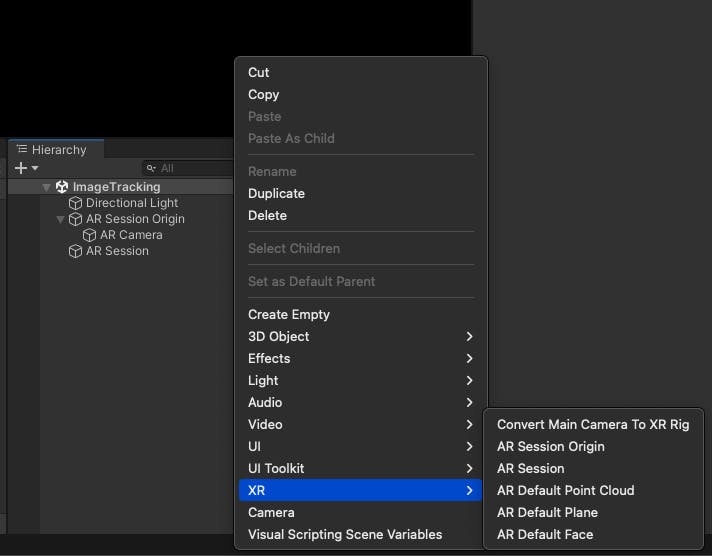
You might be able to see the XR option only after finishing the Step 1.
Delete the existing Main Camera object that was created from 3D template as AR uses it's own AR Camera which comes with AR Session Origin.
AR Session is a very important subsystem of AR, it refers to an instance of AR. While the other XR subsystems provide specific pieces of functionality like image tracking, motion tracking, this session controls the lifecycle of all XR subsystems. If we Stop(or fail to create) an XRSessionSubsystem, then other XR Subsystems might not work.
Create an iOS build configuration in a folder (Assets/Builds/iOS) and run xcodeproj file in Xcode.
Before creating a build, we would need to do some configurations on Player Settings,
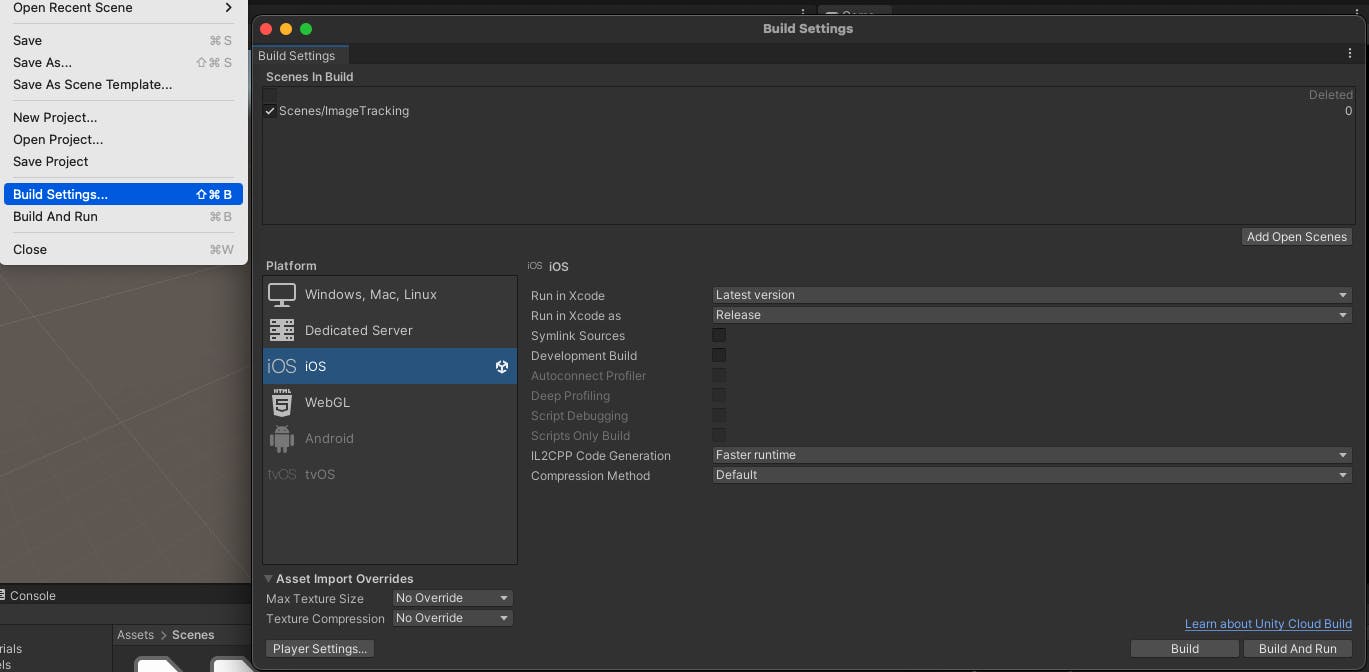
Go to File > Build Settings, it will open a dialog something like in the image.
Change the Company Name and Product Name of your choice, just don't keep it default. It should reflect on the Bundle Identifier.

Next, scroll down in Player Settings,
Tick on Requires ARKit Support, it must be showing a warning that Target minimum iOS version needs to be 11.0 or latest, so if not set then set it to 11.0.
Architecture must be set to ARM64, depend on your Unity version it might be disabled and by default is showing selected as ARM64 but it can be changed from Target SDK, if you change it to Simulator SDK it will be set to x86_64.

Now we're good to go !!
Close the Player Settings dialog and Continue on Build Settings, first click on Add Open Scenes, then your Scene will get added. Then click on Build.
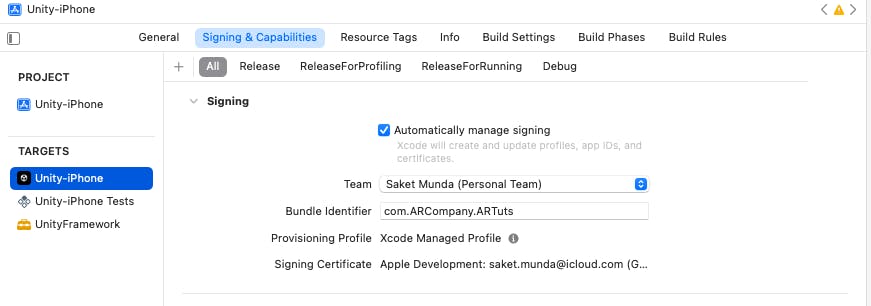
After a successful build, iOS files must be generated into your selected folder. Open xcodeproj file in XCode and in the folder structure click on Unity-iPhone and Go to Signing & Capabilities tab.
We need to configure our profile here, and add your account.
If your device is connected and when you Build the app, you'll see nothing but just this blog through your device's camera, if you followed the steps along reading.

We need to add some assets or objects into our scene to show something meaningful and see AR in action. I'll cover those in coming blogs.
Until Then.
Keep Building Yourself

